Interlocking Paving Stones: A 10-Step Installation Guide
Interlocking Paving Stones: A 10-Step Installation Guide
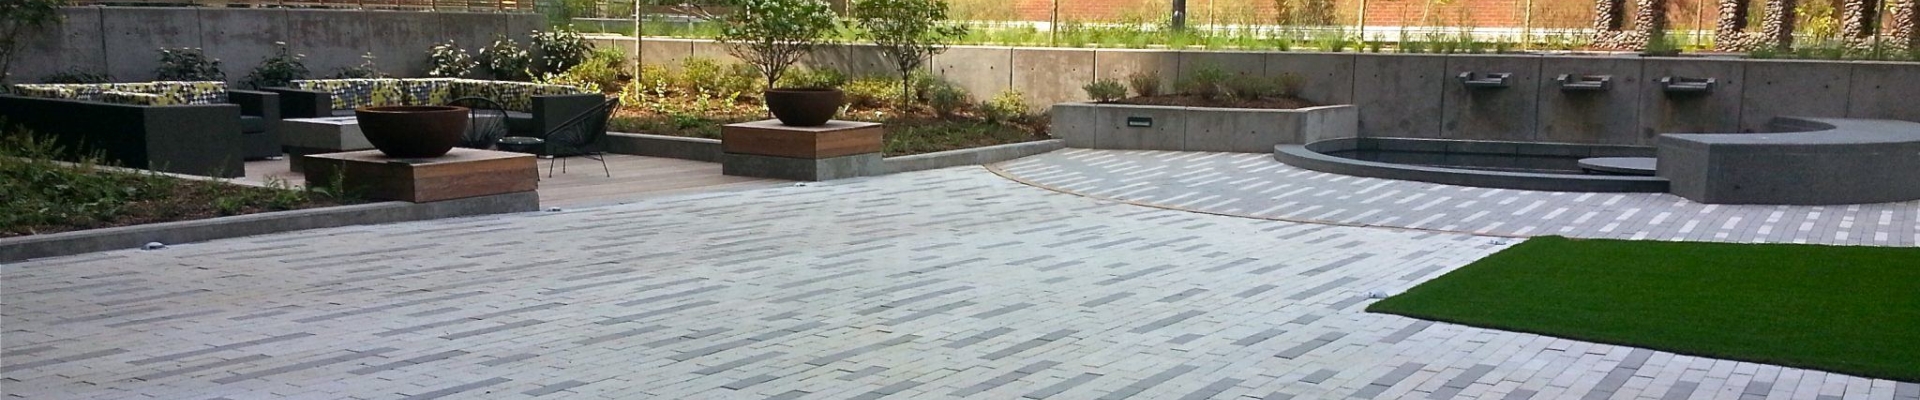
Paving stones provide a beautiful, strong and long-lasting surface as a means to enhance outdoor living and create more space for you to enjoy the sunshine, shade and breezes of nice days. People enjoy being outside to visit, relax, play, cook, eat, drink and read, among other things, and interlocking paving stone can create the perfect outdoor space as well as a tough driveway or parking area.
You can arrange the stones however you like to make the ultimate outdoor living room with a fireplace, a pool area, a modern-design driveway and more. Additionally, a well-done design adds curb appeal, freshens the look of your home and increases your living space. You might be an ambitious and talented do-it-yourselfer who can tackle interlocking paver installation, or you may prefer to call in the experts.
However, if you do end up completing the project yourself, there are some steps to take to adequately start the process and finish with a good result. The first thing you need to know about is the benefits of interlocking paving stones. They can:
Gain compressive strength of 8,000 pounds per square inch (psi) — poured or preset concrete nets 4,000 to 5,000 psi
Achieve minimum water absorption
Meet freeze-thaw standards of frigid climates
Get better cold-weather durability than asphalt
Be installed with no requirement for expansion joints
Withstand high human or vehicle traffic
Be easily replaced with a matching paver
Come in an array of colors, shapes and textures
Create symmetry, patterns or a creative design
Consist of materials that meet or exceed industry standards
Enjoy a long life since pavers last for 20-25 years
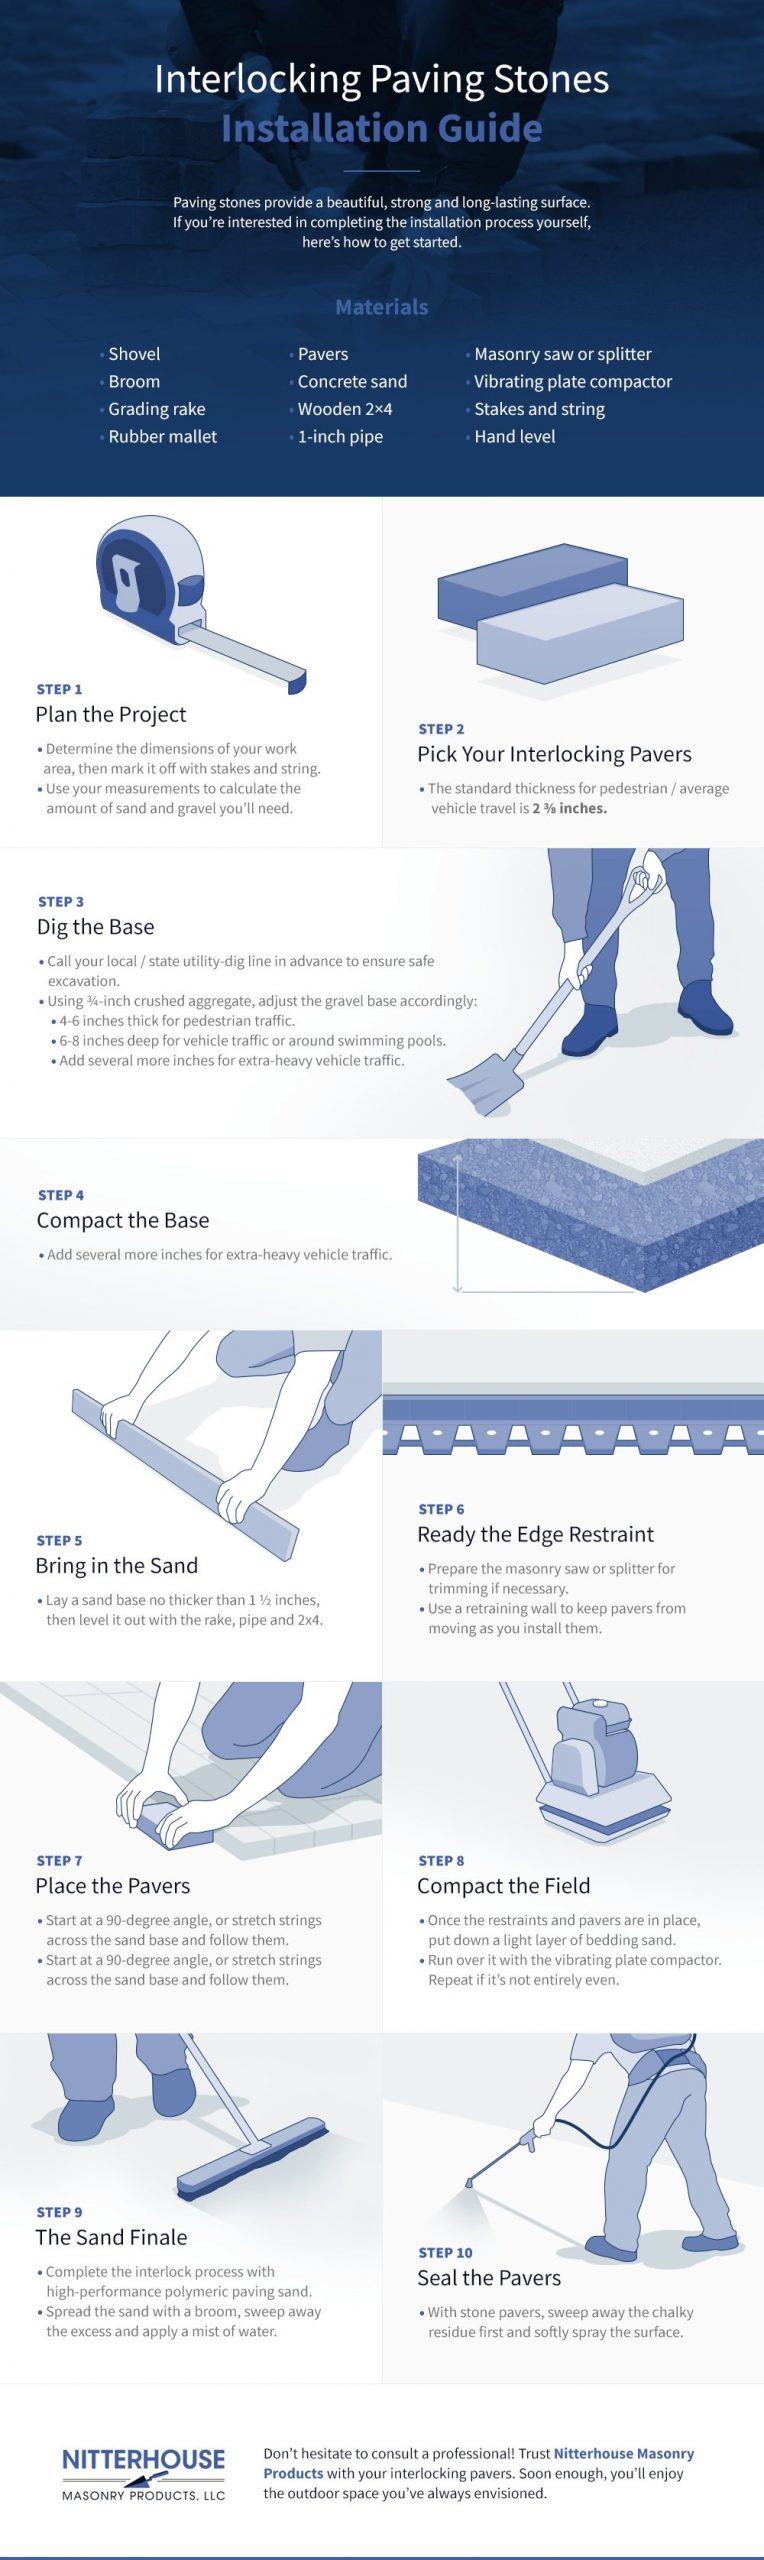
Installing paving stones is possible if you follow the steps and invest time and care into each one. You can hardly be too careful when you measure, draw, plan, obtain prices and begin the project because each stage lays a base for the next.The process of how to install paving stones goes step by step — slowly and with care.
Step 1: Plan the Project
First, establish a general idea of how large an area you will create and where you want it to be. Good drainage is essential, so you will want to examine how water runs to and from the area when it rains and avoid any places that often flood or collect standing water after heavy rains. Installing permeable paving stones can reduce your worries about poor drainage because they soak up water and snow.
Generally, you want the land to slope slightly down and away from the areas you plan to use — like how homes and yards are usually situated. The standard amount of the desired incline is 1/8 inch per foot, which is usually about what you’ll find around your home and what you’ll want for the newly created space.
You can mark the area off with spray paint, stakes and strings, wood planks or other material to get a feel for the size and shape you need. Take some measurements and think about what structures the pavers will abut and what is around them. Observe how the sun hits the spot. Your preference might be to put the area in the shade, sun or a location that gets both.
Define your new outside area by placing stakes every few inches and putting string around them, taking care to allow a few extra inches around the perimeter for the restraint and edge materials. If your project has a pattern that requires centering or unique alignment, use stakes on the edge with a low string between them to mark points from which you can work. You can also carefully use chalk-coated string to mark lines on the top of the sand bed for alignment guidance.
To calculate the amount of sand and gravel you will need, measure the project dimensions, including length, width and depth. It is possible to calculate the amounts yourself with the help of industry guidelines. Alternatively, your vendor or paver installer can help figure out how many cubic yards you need for your paving stone installation.
Step 2: Pick Your Interlocking Pavers
You will encounter a broad range of colors, patterns, shapes, sizes and thicknesses when you begin looking at interlocking pavers. Marble, travertine and porcelain are new options for connecting stones that have started popping up more often in residential and commercial spaces. Typically, the standard thickness for an area with pedestrian and average vehicle traffic is 2 3/8 inches.
The array includes tumbled pavers that have rough edges and look like stone or slate. There are also bush-hammered and shot-blasted interlocking pavers, which have a textured, stone-like finish. Ground pavers resemble stone, but they are smooth like marble or granite.
Concrete pavers are the most common choice, but you can also go for interlocking brick pavers to give your exterior a rustic, traditional look. Brick pavers are stain-resistant and durable, ensuring a smooth surface with no cracks or damages. Their reddish tones look best within an outdoor patio space or nearby a lush, green garden.
Interlocking driveway pavers are specially designed to provide the stability and strength you need to prevent wear and tear. A well-designed driveway is essential for enduring the weight of vehicles and frequent pedestrian traffic. Always reinforce your driveway pavers with an edge restraint to prevent them from “walking”, or slipping out of place.
Nearly any design and style imaginable can be created with the interlocking concrete pavers. A diagonal herringbone pattern gives your outdoor space a contemporary feel while preserving that classic concrete or brick look. Basketweave styles are straightforward and attractive, offering an eye-catching design that isn’t too busy.
Step 3: Gather the Materials
You will need several basic materials for paving stone installation:
Masonry saw or splitter to trim
Vibrating plate compactor to settle the sand
Shovels to lay down the base material
Brooms to spread and sweep sand
Grading rake to even out the base material
Rubber mallet to adjust the pavers snugly into place
Enough concrete sand to accommodate your project
Wooden 2×4 and 1-inch pipe to screen the sand
Enough pavers to cover your area plus some extras for error allowance
Stakes and string to delineate where the paving stones will go
Hand level to even out bedding and joint sand
Step 4: Dig the Base
A crucial part of installing paving stones is proper preparation of the base since it is literally the foundation for your new patio, living area or driveway. Because it involves excavation of several inches deep, you’ll want to be sure and call your local or state utility-dig line a few days before you’re ready to start. That way, you can have the utilities marked and make sure you don’t hit anything important.
Preparing a good base requires the excavation of any loose or otherwise unstable soil down to the solid, compacted earth. How deep you need to dig depends on the combined thicknesses of the gravel base, sand layer and your pavers, which vary — as does how you will use the area.
For example, the recommendations are to provide a base of gravel 4-6 inches thick for average pedestrian traffic, which requires you to dig about 7-9 inches deep. For vehicle traffic and around swimming pools, the gravel base should be 6-8 inches deep — with even a few more inches if you plan to park or drive an extra-heavy vehicle on the surface, such as a recreational camper or an 18-wheeled truck.
The most common advice on gravel size for the base is 3/4-inch crushed aggregate. You will need to use the plate compactor between layers of the gravel so it becomes compacted into place. Keep adding gravel and compacting until you reach the desired base depth. It can help with the compaction process to slightly wet the gravel — not a soaking but a light mist.
If you decide to use compacted soil during your project, ensure there’s another foundational material on top of it. Installing connecting pavers directly on top of the dirt can interfere with drainage and cause unevenness. Compacted soil should only serve as a subgrade to sand, gravel or other bases.
Step 5: Bring in the Sand
You need a sand base no thicker than 1.5 inches for your paving-stones installation, and it helps to make sure you use a quality bedding sand. The Interlocking Concrete Pavement Institute gives specifications for the standard of sand to use in a paver setting bed:
ASTM C33 and CSA A23.1
ASTM C-144 and CSA 179 graded mason’s sand is an accepted alternative.
ASTM stands for the American Society for Testing and Materials, and CSA stands for calcium sulphoaluminate.
Sand quality matters a lot because it is made with different particle contents for various projects. Some contractors would use the same sand to fill the joints as they used to bed the interlocking paving stones. Other people want to use the material specifically mixed to fill the joints and cracks of a paver project.
As you pour in sand for the base, use the rake, pipe and 2×4 to work it into the spaces — and any combination of objects to even it out. A “screed rail” is a tool used to level out concrete or sand. This tool varies in design, but it’s essentially a heavy piece affixed to an accessory that drags it across a surface to make the surface even. You can buy or sometimes rent screed rails, which typically come in 16-foot, 9-inch sections that can then be trimmed to fit.
Using tools is necessary because they help accomplish your goal of cultivating a perfectly even and smooth surface for the sand base of your paving stone installation. Depending on the size of your area, you might want to work in sections. While hardly anything is perfect, you can aim for this goal because the bedding sand is where your pavers will rest.
If the sand is uneven, the pavers will be, too, and rocks or divots in the sand will prevent the pavers from seating properly. Use a level to ensure a quality surface that is even and smooth. To check your sand bed, gently place the wooden 2×4 down on its broad edge and then put the level on top of that. Once the sand is perfectly level, take care not to allow anyone to step on it. Additionally, be prepared to lay the stones within a day so the sand bed’s integrity remains true.
Step 6: Ready the Edge Restraint
Plan to have a restraining wall of sorts around the perimeter of where you lay pavers to keep them from moving and shifting as you install them. The restraint could be concrete blocks that match the pavers, the side of your home or special edging that you secure with ground spikes.
If you use your home or the molded edging with spikes, the edge restraint can be put into place before the pavers. However, if you use concrete restraints, place them after most of the pavers are laid but before you put the edge piece in place. Concrete restraints are usually tacked with wet-set concrete.
You’ll see when you get close to the edges that some trimming will be necessary to fit the end pavers in. You can trim with either a masonry saw, which is the most precise tool, or a masonry splitter. The goal with trimming is to fit the final piece in as snugly as possible and to try not to leave any visible rough cutting edges.
Step 7: Place the Pavers
Depending on the design and pattern you chose, it might be necessary to stretch strings across the sand base to keep the pavers straight and maintain the design. Once you’re ready, begin placing pavers either by starting in a 90-degree-angle or following the string you stretched across the space. Some people will draw out a paper or cardboard guide to remind them of the sequence needed to create their desired look.
When placing the paver, it is important to set it into place evenly and gently without disturbing the sand from extra motion. The best installation method is to hold the stone between two hands and get it into the exact position before lowering it into place. A slight slide to one side or the other won’t be as detrimental as angling the stone into place since you’re trying to maintain that perfectly flat sand base you created.
Pavers should feel tight by hand but will have a built-in space between them about 1/16 of an inch to 3/16 of an inch wide, and that is normal. People commonly lay the pavers in rows, but you can work the “field” with nearly any method as long as you’re consistent and don’t disturb the sand — other than setting the pavers into place.
Step 8: Compact the Field
Once you have all your pavers and restraints in place, put down a light layer of bedding sand, and then run over it one time with the vibrating plate compactor — which you can rent from many kinds of equipment shops. This stage creates the initial part of the “interlock” of interlocking stone pavers. During this first step, the sand will begin to settle into place as well as get squished up between the pavers.
Compacting the sand into your connecting pavers builds the bonds between the stones and makes them resistant to shifting. Check your work with a level — if it’s not entirely even, you can run over it again.
You have the option of using a compactor pad with the vibrating plate compactor. This pad will protect your new interlocking stones from any potential scratches or damages from the plate.
Step 9: The Sand Finale
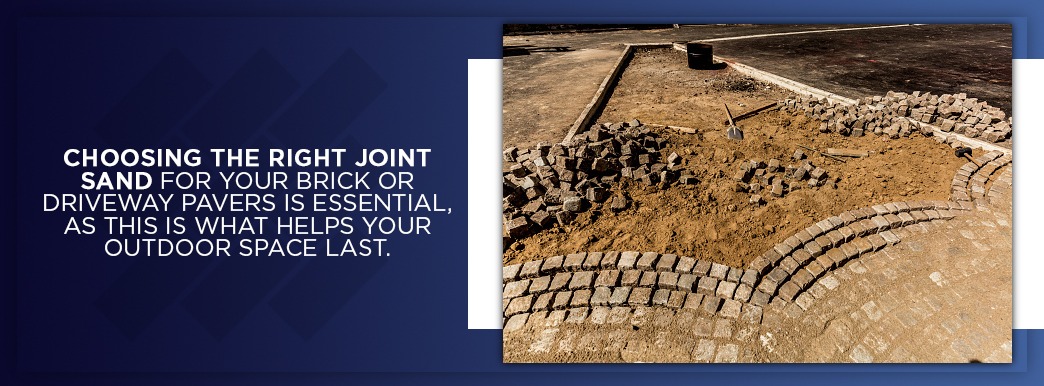
Complete the interlock process with more sand — high-performance polymeric paving sand, also known as joint sand for use in the joints of such paving stone installations. The sand comes in different colors to complement many styles and design ideas. It also offers longevity and durability by preventing erosion, frost damage and weed growth.
Choosing the right joint sand for your brick or driveway pavers is essential, as this is what helps your outdoor space last. High-performance sand ensures a high-quality installation. You won’t have to go back one or two years down the road and redo everything.
The goal with this sand application is to fill every crack and crevice. You can dump the sand on top of the new area and then spread it around with the brooms until all the joints are full. It is preferable to sweep away the excess as opposed to using a tool like a leaf blower, which might blow away the sand that’s filling the cracks and crevices.
Plan your paving stone installation for sunny weather — a heavy rainfall can make the sand sticky and hard to manage. Use a light mist of water to harden the sand once you complete the application. The joint sand will need a few days to set afterward, preferably in warm and dry weather.
Step 10: Seal the Pavers
It is optional but advisable to seal your interlocking stone pavers following installation. The sealant helps the pavers resist stains from environmental components, such as oils and weed growth. A sealant also boosts the color, and it is another aid to hold the joint sand in place. You will have to reseal the pavers every few years depending on the type of sealant you use.
If you seal with an epoxy- or urethane-based product, the expected life span is probably 5-10 years. If you seal with an acrylic-resin product, expected lasting power is about 1-3 years.
One factor to be aware of before you seal is the natural efflorescence of stone pavers. It will look to you like chalky, dusty residue and is a naturally occurring substance that should be removed before the sealant is applied. Some people will wait a few weeks and let it wear off naturally then seal the pavers, while others will sweep and lightly spray the surface to remove the efflorescence.
Your paved stepping stones will be stable and ready for use at this stage. Wait until a few weeks after installation to clean your brick or concrete pavement for the first time. Doing it too soon can affect the joint sand, which might require a reapplication.
Consult a Professional When Needed
Expertise makes a world of difference in masonry and concrete work, and we enjoy helping people find the right pavers or other outdoor treatments to suit them, their environment and the use they envision.
Nitterhouse Masonry Products is a family-owned business that began in 1923 when a single mason started honing his expertise and making quality concrete blocks in his garage. Our professionals will help you choose the appropriate pavers to completely transform your patios and walkways.
To create an ideal outdoor space, you’ll need knowledge in everything from materials, setting and sealing to vision, layout and style.
Contact us
ANYTIME YOU NEED A PROFESSIONAL PARTNER FOR A PATIO, WALKWAY, DRIVEWAY, RETAINING WALL OR OTHER EXTERIOR PROJECTS.